¶ Introduction
Conductor is a workflow orchestrator created by Netflix for internal use. It was since open-sourced and released to the community in the form of the Conductor OSS project. It provides a sequential execution of workflow tasks of several types (worker tasks, human interaction tasks, decision tasks, fork tasks etc.), and allows for the creation of workers in any language, as long as they can communicate with the Conductor server. Many languages have dedicated SDKs for simplifying the development of workers (also open-sourced) such as Java, Python, Node.js and Go. The Conductor server manages execution states, automatic retries, re-execution of failed workflow instances and other aspects that ensure correct execution and state keeping, freeing the workers code to focus mainly on what matters most, the business code.
Since it was originally developed by a private company and later open-sourced, it also has a paid cloud version called Orkes, which has more features and better support. Finding information on the open-source version is sometimes a little tricky, So I created a few small recipes that I compiled after much research, trial and error below.
¶ Tasks
¶ DECISION and SWITCH tasks
Are DECISION and SWITCH tasks the same thing? Yes! Not sure if there are subtle differences, but they do the same thing as from my tests. For very simple decision taking (based on only one variable or param), you can use the default settings and define it with "caseValueParam": "<inputParamName>". For something a little more sophisticated, you can use "evaluatorType": "javascript" and then an evaluated javascript expression as in this example:
"expression": "$.input_param1 == 'NORMAL' && $.input_param1 == 'NORMAL' ? 'NORMAL' : 'ABNORMAL'"
I tried to use modern (>=ES6) syntax, but you get complaints as soon as you try to create the workflow. To illustrate, the following task definition would not work:
{
    "name": "results_decision",
    "taskReferenceName": "results_decision_ref",
    "inputParameters": {
        "results": ["${task1_ref.output.result}", "${task2_ref.output.result}"]
    },
    "type": "SWITCH",
    "evaluatorType": "javascript",
    "expression": "$.results.every(v => v === 'NORMAL')",
    "decisionCases": {
     ...
    }
}
So, to accomplish the same task as above with older javascript syntax, you would do something like this beast of an expression - nonetheless, a working one:
"expression": "function x(){ res = true; for(v in $.results) res = res && $.results[v]==='NORMAL'; return res } x();",
¶ Workflow timeout vs Task timeout
The workflow timeout is a global timeout for the workflow. It can be set in the workflow definition through timeoutPolicy and timeoutSeconds. If you want to not set a timeout for the workflow at all and configure it per tasks, you can use the following for the workflow:
    "timeoutPolicy": "TIME_OUT_WF",
    "timeoutSeconds": 0
Then, for each task, you can use the following construct to control the task timeout individually:
{
    "name": "task1",
    "taskReferenceName": "task1_ref",
    "type": "HUMAN",
    "taskDefinition": {
        "timeoutSeconds": 3600
    }
}
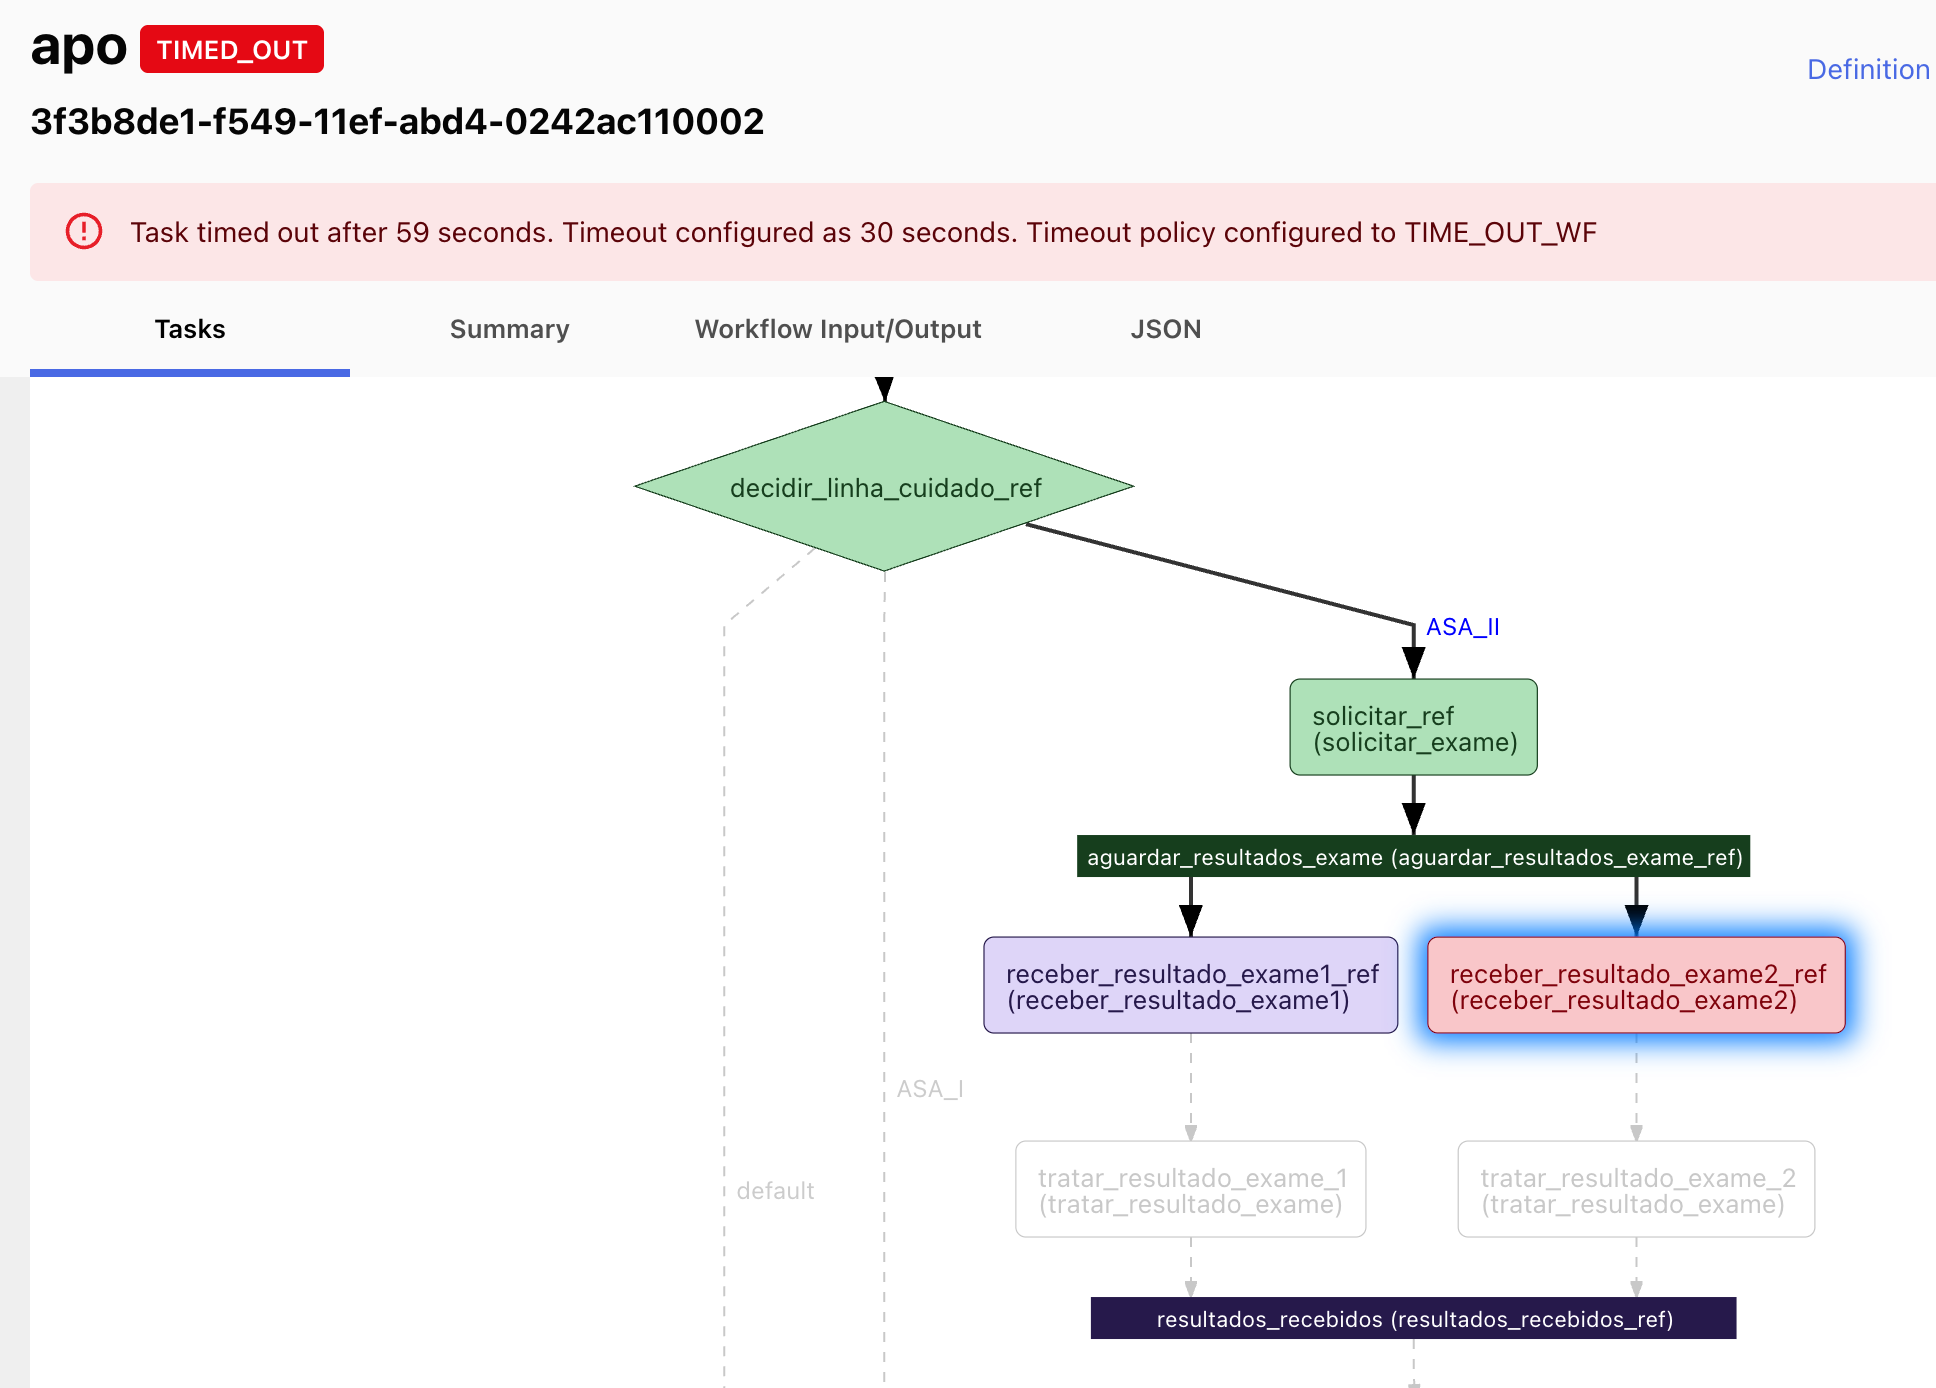
Please note that a timeout in any particular task will cause the whole workflow to timeout as well. If there are other running tasks (in case of a fork), they will be cancelled. Below is an example of that. Green tasks were executed, the red task timed out and the purple ones (both a regular task and a join) were cancelled.
¶ Rerun workflow from a specific task ID
A timed out of failed workflow can be manually rerun (as a whole or from a specific task, reusing the execution state for previous task).
To execute the whole workflow from the beginning, you can use the following API call - replacing <WORKFLOW_ID>:
curl -X 'POST' \
  'http://localhost:8080/api/workflow/<WORKFLOW_ID>/rerun' \
  -H 'accept: text/plain' \
  -H 'Content-Type: application/json' \
  -d '{
  "reRunFromWorkflowId": "<WORKFLOW_ID>"
}'
For rerunning from a specific task (and keeping the results from previous tasks), you can use the following : replace both <WORKFLOW_ID> and <TASK_ID>:
curl -X 'POST' \
  'http://localhost:8080/api/workflow/<WORKFLOW_ID>/rerun' \
  -H 'accept: text/plain' \
  -H 'Content-Type: application/json' \
  -d '{
  "reRunFromTaskId": "<TASK_ID>"
}'
Please note that, if a task times out inside a fork, task(s) from the other branch(es) of the fork that were not yet completed might be canceled. In this case, the best option is to rerun the fork task itself.
¶ HUMAN tasks
Here's a shell script for quick and dirty interaction with a pending human task. You can execute it passing the workflow ID as the parameter.
WORKFLOW_ID=$1

# Replace referenceTaskNameValue below by the task reference name that you want to interact with
TASK_ID=`curl -s -X GET http://localhost:8080/api/workflow/$WORKFLOW_ID?includeTasks=true|jq -r '
.tasks[] |
select(.referenceTaskName=="referenceTaskNameValue") |
.taskId '`

# Replace the keys and values in outputData for any JSON contents you want to send as the output of your task.
# An example would be an uploaded document URL or a database ID.
curl -X POST -H "Content-Type:application/json" http://localhost:8080/api/tasks -d '{
    "workflowInstanceId": "'$WORKFLOW_ID'",
    "taskId": "'$TASK_ID'",
    "callbackAfterSeconds": 0,
    "status": "COMPLETED",
    "outputData": {
        "key1": "value1",
        "key2": "value2",
    }
}'
¶ FORK_JOIN_DYNAMIC tasks with sub-workflows
Forking dynamically is something that is not as easy to understand in the official documentation, but it is a very powerful tool. So here's a little more involved example to hopefully make it clearer.
Let's say you have a numeric list as an input and also two sub-workflows sub-even and sub-odd, and that you need to run sub-even for even numbers and sub-odd for odd ones. Also, each workflow expects that number as an input parameter with the name number_variable. So, before you define your fork task, let's put first a simple task for determining how the fork is going to happen. Here's the code for this task, written in Python - note that it's not as trivial of a task as it might seem in the docs:
@worker_task(task_definition_name='determine_workflows')
def determine_workflows(numbers_list: list[int]) -> dict:
    tasks = [
        {
            "subWorkflowParam" : {
               "name": "sub-odd" if item%2 else "sub-even",
               "version": "1"
            },
            "type" : "SUB_WORKFLOW",
            "taskReferenceName": f"sub-numbers-{idx}",
         } for idx, item in enumerate(numbers_list)
    ]

    inputs = {f"sub-numbers-{idx}": {"number_variable": item} for idx, item in enumerate(numbers_list)}

    return {
      "tasks": tasks,
      "inputs": inputs
   }
Also, note that the reference name for the tasks are sequential and zero based (as in the enumerate method from Python) to avoid repeated names, otherwise we can get an error. So now, let's put together the definition of the determine_workflows task and the dynamic fork and join tasks. They would be defined as this:
{
  "name": "determine_workflows",
  "taskReferenceName": "determine_workflows_ref",
  "inputParameters": {
    "numbers_list": "${workflow.input.numbers}"
  },
  "type": "SIMPLE"
},
{
  "name": "process_odd_and_even",
  "taskReferenceName": "process_odd_and_even_ref",
  "inputParameters": {
    "workflowNames": "${determine_workflows_ref.output.tasks}",
    "inputs": "${determine_workflows_ref.output.inputs}"
  },
  "type": "FORK_JOIN_DYNAMIC",
  "dynamicForkTasksParam": "workflowNames",
  "dynamicForkTasksInputParamName": "inputs"
},
{
  "name": "process_odd_and_even_join",
  "taskReferenceName": "process_odd_and_even_join_ref",
  "type": "JOIN"
}
Now, let's say that each sub-workflow returns an object like this:
{
  "result": "RESULT",
  "description": "Sample description for the outcome of the sub-workflow."
}
Assuming you had [1, 2, 3] as your input to the determine_workflows task, then the join task would have an output very similar to this one:
{
  "sub-numbers-0": {
    "subWorkflowId": "1b0d5738-cfc3-4ae1-92f2-f6ad13478943",
    "result": "RESULT",
    "description": "Sample description for the outcome of the sub-workflow."
  },
  "sub-numbers-1": {
    "subWorkflowId": "b3bb7b5e-c2ad-41f2-b78a-a9ab493019a8",
    "result": "RESULT",
    "description": "Sample description for the outcome of the sub-workflow."
  },
  "sub-numbers-2": {
    "subWorkflowId": "b3bb7b5e-c2ad-42f7-a58b-a385fa3019a8",
    "result": "RESULT",
    "description": "Sample description for the outcome of the sub-workflow."
  }
}
Now, you can normally use this output in later tasks referencing them as ${process_odd_and_even_join_ref.output}.
¶ Get metadata during worker execution
Usually, the workers should be simple enough that you just define the input attributes directly in the method signature, pretty much as they are defined in the task inputParameters object. But sometimes, maybe you need to have access to the task metadata programmatically. Usually, the SDKs will provide you a way to receive the complete task data (including the usual inputParameters) by specifying a Task as the input. Here's an example using the Python SDK:
from conductor.client.http.models import TaskResult, Task
import logging


logger = logging.getLogger(__name__)

@worker_task(task_definition_name='execute_complex_stuff')
def execute_complex_stuff(task: Task) -> TaskResult:
    logger.debug(f"Executing complex stuff for workflow id {task.workflow_instance_id}")

    # the inputParameters can still be accessed through task.input_data:
    name = task.input_data["name"]

    # you can also programmatically define the task result status
    task_result = task.to_task_result(TaskResultStatus.COMPLETED)

    # and add output data as key,value pairs
    task_result.add_output_data('info', f"Task completed successfully for workflow {task.workflow_instance_id}")

    return task_result
¶ Raising non-retryable exceptions
In your workers, you can raise non-retryable exceptions whenever you want to immediately fail the workflow execution (due to an unrecoverable error that requires the workflow to be restarted, for example).
from conductor.client.worker.exception import NonRetryableException
@worker_task(task_definition_name='treat_unrecoverable_error')
def treat_unrecoverable_error(result: str, reason: str) -> str:
if result == "ERROR":
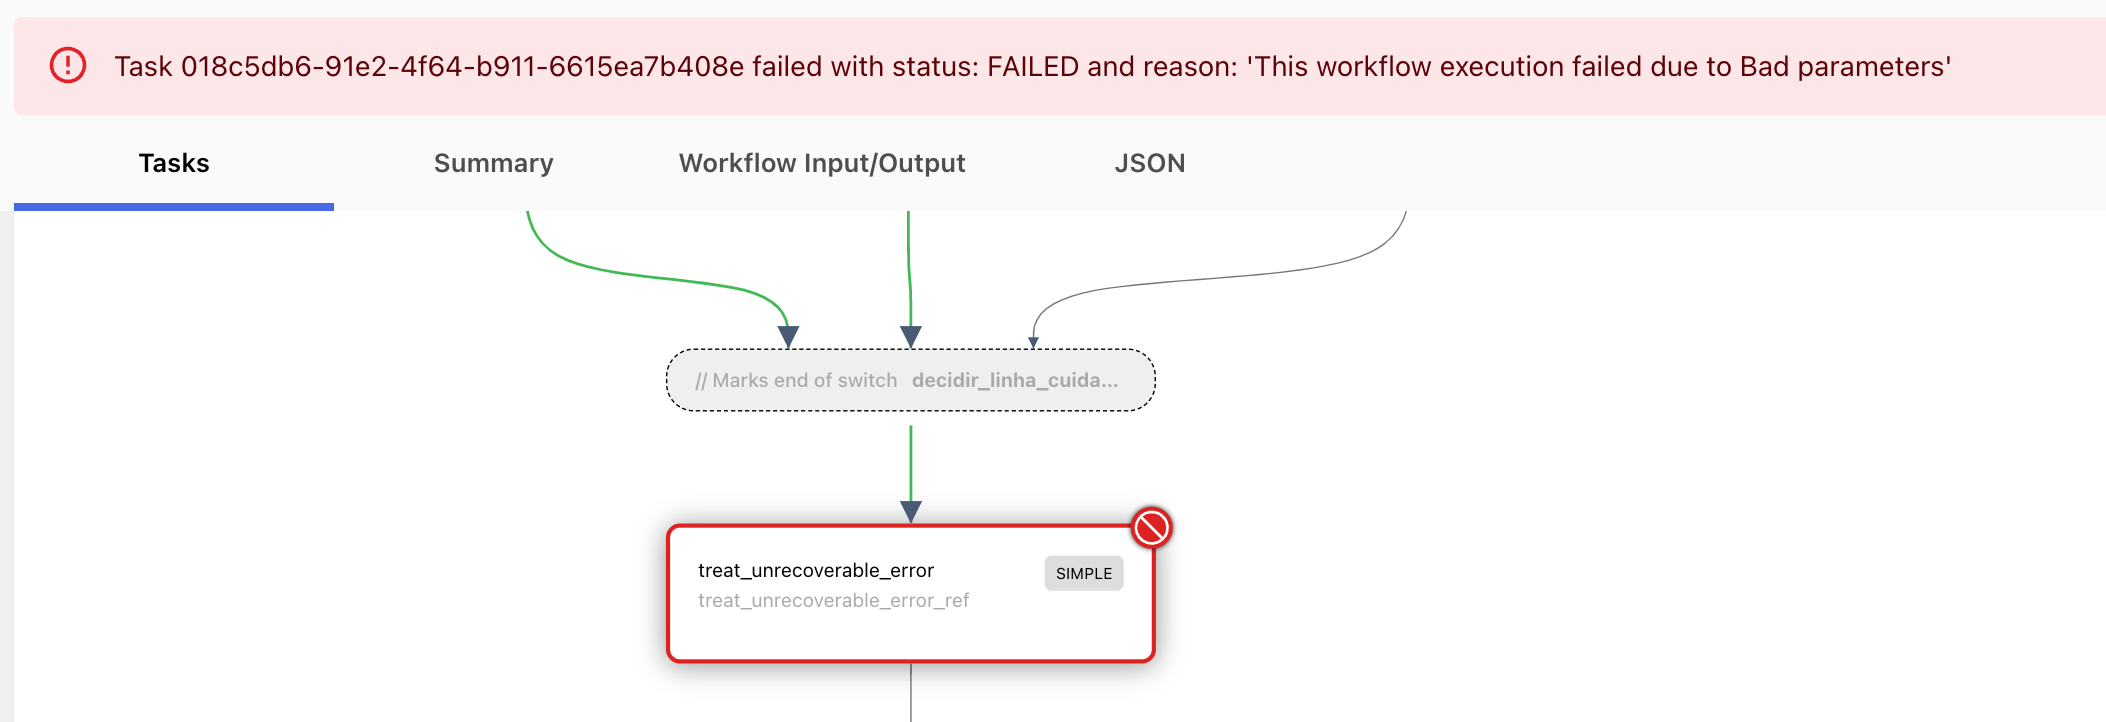
raise NonRetryableException(f"This workflow execution failed due to {reason}")
return "Result was successful"
If the exception is raised, the workflow will fail, and the task will be concluded with status FAILED_WITH_TERMINAL_ERROR as such as well:
¶ Security
¶ Simple security with NGINX reverse proxy
The OSS version of Conductor is very insecure by default, since it doesn't use any kind of authentication / authorization mechanism, especially if you are using the docker image. A quick way of adding some layer of security is to:
- Create a reverse proxy to it through NGINX
- Secure it with some method supported by NGINX, both for the API and the UI ports. Here's a very simple NGINX snippet for illustrating protecting the API port. This simply checks for the Authorization header with a particular Bearer value:
server {
    listen 8080;
    location / {
        if ($http_authorization != "Bearer 0e3e75234ab") {
            return 401;
        }
        proxy_pass http://conductorserver.yourdomain.com:8080;
        proxy_set_header Host $host;
        proxy_set_header X-Real-IP $remote_addr;
        proxy_set_header X-Forwarded-For $proxy_add_x_forwarded_for;
        proxy_set_header X-Forwarded-Proto $scheme;
    }
}
- Add a rule in your VCP or VLAN so that the Conductor server can only be accessed from outside through the NGINX server's IP address.
- Now, all application or UI calls to the server will need to go through the NGINX proxy.
Trying to access it without the header:
samueljoaquim@Samuels-MacBook-Pro: ~$ curl \
https://nginx.yourdomain.com/api/workflow/3b88fb56-f54b-11ef-abd4-0242ac110002?includeTasks=true

<html>
<head><title>401 Authorization Required</title></head>
<body>
<center><h1>401 Authorization Required</h1></center>
<hr><center>nginx/1.27.4</center>
</body>
</html>
With the correct header:
samueljoaquim@Samuels-MacBook-Pro: ~$ curl \
-H "Authorization:Bearer 0e3e75234ab" \
https://nginx.yourdomain.com/api/workflow/3b88fb56-f54b-11ef-abd4-0242ac110002?includeTasks=true | jq

{
  "ownerApp": "",
  "createTime": 1740688894196,
  "updateTime": 1740689279756,
  "status": "COMPLETED",
  "endTime": 1740689279756,
  "workflowId": "3b88fb56-f54b-11ef-abd4-0242ac110002",
  "tasks": [
     ...
  ]
}
¶ Override SDK to use Authorization header along
If you use an SDK for creating your workers, you can override the defaults a little bit so that it can also work with the proper authorization header. Here's an example on how to do it for the Python SDK when creating the Configuration object (replace settings.conductor_base_url with the base URL for your conductor server and settings.conductor_proxy_token for the actual token):
    api_config = Configuration(debug=False, base_url=settings.conductor_base_url)
    if settings.conductor_proxy_token:
        secured_session = requests.Session()
        secured_session.headers["Authorization"] = f"Bearer {settings.conductor_proxy_token}"
        api_config.http_connection = secured_session
¶ Enhanced security with OpenResty + Keycloak
Although the above example is ok for a simple layer of security, it's always best to use a true and tested IDC provider for properly securing an API. For that, we're going to use Keycloak. Also, we're going to use OpenResty as the proxy, which is based in NGINX as well, but supports openidc integration with specific modules. For this example, we're going to use only local Docker containers so that it is easily testable - of course, this is just for local development and production should always use a schema similar to the above example (VPC fencing etc).
This is the port configuration that we will use for this example:
Conductor UI port: 8127 - This is the insecure conductor UI port provided by the Conductor docker compose file.
Conductor API port: 8080 - This is the insecure conductor API port provided by the Conductor docker compose file.
Keycloak port: 8081 - This will be the port for accessing Keycloak through docker.
UI proxy port: 8082 - This will be the secured UI port. It will secure both the UI and the API calls under the web browser through an authenticated user in Keycloak.
API proxy port: 8083 - This will be the secured API port. This will be for external calls only (i.e., not through the browser), and will require a JWT token.
First, let's start a Keycloak docker instance:
docker run -p 8081:8080 \
  -e KEYCLOAK_ADMIN=admin \
  -e KEYCLOAK_ADMIN_PASSWORD=admin \
  quay.io/keycloak/keycloak:latest start-dev
Access the Keycloak admin dashboard in http://localhost:8081/admin using admin for both user and password.
Now, let's create two realms in Keycloak admin dashboard. One will be called ui-realm, the other will be api-realm. The names already explain what each one will be used for. For the ui-realm, we're going to use Keycloak logging our user and then redirecting the user to the proxied UI server when properly authenticated. For the api-realm, we're going to use Keycloak to generate a JWT token, which will be validated by the proxy before forwarding the API request (which should always be prefixed with the /api path).
In the ui-realm, create a new Client with client id conductor, using OpenID Connect. Set "Client Authentication" and "Authorization" to on. Use redirect url as http://localhost:8082/redirect (this assumes the proxy server port will be on 8082). Next, create a user in this realm. Give it a valid username and set a password under Credentials.
In the api-realm, create a new Client with client id rest-api-client, also using OpenID Connect. Set "Client Authentication" and "Authorization" to on as well. Since we are going to use this client for service accounts (e.g., JWT token), we're not going to need to create a user for this.
Now, let's configure our OpenResty proxy. First, let's create the config file to support both cases mentioned above. We'll call it default.conf:
server {
  server_name localhost;
  listen 81;

  location / {
    access_by_lua_block {
      local opts = {
        discovery = "http://192.168.0.79:8081/realms/api-realm/.well-known/openid-configuration",
        client_id = "rest-api-client",
        client_secret = "<API_CLIENT_SECRET>",
        ssl_verify = "no",
        access_token_expires_leeway = 30,
        renew_access_token_on_expiry = false,
        accept_none_alg = false,
        accept_unsupported_alg = false,
      }

      local res, err = require("resty.openidc").bearer_jwt_verify(opts)

      if err or not res then
        ngx.status = 403
        ngx.say(err and err or "no access_token provided")
        ngx.exit(ngx.HTTP_FORBIDDEN)
      end
    }

    proxy_pass http://host.docker.internal:8080;
  }
}

server {
  server_name localhost;
  listen 80;

  location / {
    access_by_lua_block {
      local opts = {
        redirect_uri = "http://localhost:8082/redirect",
        client_id = "conductor",
        client_secret = "<UI_CLIENT_SECRET>",
        discovery = "http://192.168.0.79:8081/realms/ui-realm/.well-known/openid-configuration",
        ssl_verify = "no"
      }

      local oidc = require("resty.openidc")
      local res, err = oidc.authenticate(opts)

      if err then
        ngx.status = 500
        ngx.say(err)
        ngx.exit(ngx.HTTP_INTERNAL_SERVER_ERROR)
      end

      -- Forward user info to the backend
      ngx.req.set_header("X-User-ID", res.id_token.sub)
      ngx.req.set_header("X-User-Email", res.id_token.email)
    }

    proxy_pass http://host.docker.internal:8127;
  }
}
You'll need to change a couple of things in the file above. First, change <UI_CLIENT_SECRET> and <API_CLIENT_SECRET> with their respective values, which you can get in the Client Secret field under the Credentials tab for each client. Also, notice in the above file that the discovery = "http://192.168.0.79:8081... attribute for each realm uses the LAN IP address, and not localhost or host.docker.internal. OpenResty has some limitations in resolving those hostnames for the Docker IP, so we're going to simply use the LAN IP of our local machine, which should be ok. Of course, in a production environment, all hosts will have proper IPs or host names that can be resolved through DNS, so this should not be an issue. Don't forget to change the discovery attribute in both cases to your own IP, keeping 8081 as the port.
Now, create a Dockerfile for it. We're going to install the lua-resty-openidc over the default openresty/openresty:1.21.4.1-0-alpine-fat image:
FROM openresty/openresty:1.21.4.1-0-alpine-fat

RUN /usr/local/openresty/luajit/bin/luarocks install lua-resty-openidc
Do a docker build for the image (something like docker build -t my/openresty .) and then run it with docker run -p 8082:80 -p 8083:81 -v ./default.conf:/etc/nginx/conf.d/default.conf my/openresty. This should use our default.conf file created previously.
For testing the UI, access http://localhost:8082 in your browser and make sure you get a Keycloak login page as in the picture below. You should be able to use the ui-realm user that you previously created to login into Keycloak and then be redirected to the Conductor UI when the login is successful.
For testing the API, let's first get a JWT token from Keycloak (notice the 8081 port in the first request) and then validating that you are able to use this JWT token when making proxied requests to the API (now, through port 8083). Please change the API_CLIENT_SECRET accordingly, as well as the workflow ID in the API request:
samueljoaquim@Samuels-MacBook-Pro: ~$ ACCESS_TOKEN=`curl -L --insecure -s -X POST 'http://localhost:8081/realms/api-realm/protocol/openid-connect/token' \
 -H 'Content-Type: application/x-www-form-urlencoded' \
 --data-urlencode 'client_id=rest-api-client' \
 --data-urlencode 'grant_type=client_credentials' \
 --data-urlencode 'client_secret=<API_CLIENT_SECRET>' | jq -r .access_token`

samueljoaquim@Samuels-MacBook-Pro: ~$ curl \
-H "Authorization:Bearer $ACCESS_TOKEN" \
http://localhost:8083/api/workflow/67989b63-c46d-4ff5-8831-c9e06a8f35b0?includeTasks=true | jq

{
  "ownerApp": "",
  "createTime": 1740688894196,
  "updateTime": 1740689279756,
  "status": "COMPLETED",
  "endTime": 1740689279756,
  "workflowId": "3b88fb56-f54b-11ef-abd4-0242ac110002",
  "tasks": [
     ...
  ]
}